

Work-from-Home Ergonomics 101: Setting Up Your Remote Office
From Rachel Pelta at FlexJobs
Since many of us are working at home right now (and weren’t expecting it), lots of people are improvising their “workstation.” For some, that means working at a desk, and for others, that means sitting on the couch or commandeering the kitchen table during work hours.
We’ve got some advice on how to set up an ergonomic workspace at home. While it’s best if you can buy the right equipment, that doesn’t mean you have to. Sometimes simple works, so we’ve included some DIY work-from-home ergonomic hacks you can use with things you’ve probably got at home.
Why Ergonomics Matter
The dictionary definition of ergonomics is, “an applied science concerned with designing and arranging things people use so that the people and things interact most efficiently and safely.”
Efficiently and safely are the important parts of the definition. Think about it like this: you’re sitting at your desk typing away, and you get a pain in your neck or your back. Suddenly, you’re not thinking about completing the task as much as you are getting rid of the pain.
Having an ergonomically optimized workspace helps you work “efficiently and safely.” By protecting your body from injury (or recurring pain), you’re better able to focus on your task, which, in turn, makes you a more efficient and productive worker.
How to Set Up An Ergonomic Workspace at Home
Setting up an ergonomically correct workspace at home will take a little bit of doing on your part. At the office, you probably have access to or can order, plenty of items to help you achieve the most ergonomic setup.
While you’re working at home during the pandemic, that may not be the case. You can’t run out to the office supply store and buy what you need. And, even if you can, you may not want to drop the money on it, or take the health risk.
So, focus on helping yourself maintain a neutral spine. Contrary to what you may think, a neutral spine isn’t one that is perfectly straight. A neutral spine is one that stays in its natural curved shape.
A neutral spine is basically an S-shape. That means at the top of your spine, near your neck, your spine curves in (toward your front). In the middle, your spine curves out, and your low back curves back in.

Image from Pixabay
Whether you stand or sit for long periods, this is the best position for your spine. It takes “less work” for you to maintain a neutral spine, meaning it’s not as hard on your muscles. As you set up your workspace, take a few moments to focus on how your back feels. Is it tight? Does the position feel “unnatural”? If so, you’re probably not in a neutral spine. Keep adjusting and testing until things feel more “neutral.”
Start with Your “Desk”
Using a real desk makes setting up a home office easier. However, given the unusual nature of many work-at-home situations right now, many people are using a “desk.” Whether it’s a dining room table, TV tray, or even a folding table, whatever your desk is right now, make sure it isn’t causing posture problems.
Specifically, your desk should fit your knees, feet, and thighs comfortably underneath. You shouldn’t feel that you have to press your legs together to fit, and your knees shouldn’t bang up against anything. If you can’t fit under the desk comfortably, try out a different “desk” until you find the right fit.
Get the Right Height
No matter what you choose as your “desk,” your keyboard and mouse should be at elbow height when you are seated. Sit at the desk, hold your arms naturally and comfortably at your sides, then bend your elbows. Hold out your arms (with your elbows just slightly in front of your body but still at your sides) as if you were typing. This is the proper height for the top of your work surface.
Some desks let you adjust the height of the desk (or keyboard tray). If you don’t have an adjustable desk or are improvising a desk, you can try some hacks. Use some books or a sturdy box to raise your work surface up. If your work surface is too high, adjust your chair up, or try sitting on a pillow or some books.
Get Your Computer Set
Thanks to its portability, laptops are a popular computing option. However, laptops are not very ergonomic. The main problem with a laptop is that the screen and the keyboard are connected, making true ergonomic placement of the laptop keyboard and screen impossible.
While working on a laptop for a short time is fine, using one for longer periods (like the full workday), will not do wonders for your body. However, there are things you can do to improve laptop ergonomics when you work on it for long periods. And, even if you use a desktop with a detached keyboard, mouse, and monitor, you still have to place everything correctly, so you don’t injure yourself.
Monitor Placement
Depending on how many monitors you use, you’ll need to place them at different points on your desk. However, there are a few things you should do, no matter how many monitors you use.
First, the top of the monitor should be at or slightly below your eye level. When you look at the middle of the screen, your eyes should look slightly down. You should be able to hold your neck straight and easily see the top third of the screen. If you find yourself bending your neck up or down, adjust the screen again.
If your monitor doesn’t adjust height (or you can’t raise it any more), consider propping the monitor up on a riser (or books) to achieve the right height. If the monitor is too high and won’t lower, adjust your chair up.
The monitor should be at least arm’s length from you. This lets you view the entire screen at once—meaning you won’t have to move your head from left to right.
If the screen is arm’s length away and you still can’t see what’s on screen, enlarge the text (or wear your glasses). Larger screens may need to be farther away than “arm’s length” for you to see everything properly. If your screen is already at the far edge of the desk (away from you), move your keyboard farther from the desk to achieve the right distance.
You may also need to adjust the tilt on your screen. If you can see the screen just fine when it’s straight, leave it. However, you will likely need to angle the screen to reduce glare and achieve proper head positioning. The top will push away from you, and the bottom will come toward you.
Most people tilt the screen back between 10 and 20 degrees. However, if you wear bifocals, you may need to adjust the tilt by 30 to 40 degrees. This helps you use your bifocal lenses the right way without craning your neck.
Lastly, try to avoid direct light on the monitor. No matter how you tilt the screen, you’ll have a harsh glare that can be hard on the eyes. Try to keep the lighting to the side of the screen for indirect (and less harsh) lighting.
Which Monitor Where
Depending on how many monitors you use, you’ll need to place them differently.
One screen: center it in front of you.

Image from Pixabay
Two screens: line the screens up side by side without a gap. If you use the two monitors equally, then they should meet in the middle of your sightline (when your head is straight). If you use one more than the other, offset the less used monitor to the side. Tilt the screens slightly in, like this:

Image from Pixabay
Three screens: the main monitor should be in the middle. The other two should be one each side of the main monitor with no gap and pointed slightly in.

Image from Bigstock
Laptop Screen
When you use a laptop, you should use the same ergonomic setup for the screen. This means propping your laptop up on something to bring the top of the screen to eye level. Of course, this makes it harder to type, which is why you should use an external keyboard and mouse when you must use a laptop for extended periods.
Keyboard Placement
Placing your keyboard at elbow height is only the beginning of proper keyboard ergonomics. To ensure you’ve got the right keyboard height, place the keyboard on your work surface then try to type a few lines. As you type, your wrists should remain straight, and your upper arms should stay close to your body, without you forcing it.
With the height correct, adjust the keyboard to the proper distance. You don’t want the keyboard too close to you, and you don’t want to overreach. As you type, your elbows should hang naturally by your sides without discomfort. Consider using a wrist rest to help achieve proper keyboard placement. If you don’t have one, a sock filled with rice will do, as will a rolled-up towel.
Use a keyboard that is either flat or has a “negative tilt.” Many keyboards tilt “up,” meaning the top row of the keyboard is raised. This forces your wrists to bend up as you type and can cause discomfort.
A flat keyboard is better since it helps you hold your wrists straight. A negative tilt keyboard tilts away from you (meaning the bottom row of the keyboard is raised) and also helps promote better wrist placement.
Mouse Placement
Your mouse should be near the keyboard and easy to reach without overextending any part of your body. In general, this means placing the mouse by your dominant hand, slightly in front of, and next to the keyboard like this:

Image from Pixabay
In general, you should use a keyboard without an attached numeric keypad. This helps you keep the mouse at the proper height and within easy reach while also keeping the keyboard centered.
Consider getting a mouse riser. Similar to a keyboard or monitor riser, this is something you can attach to your desk or keyboard tray to raise the mouse to the proper height without taking up desk space or forcing the keyboard off-center.
Sit Pretty
If you’ve got an adjustable office chair, that’s great. Your work-from-home ergonomics are ahead of the game. But, just because you have an adjustable office chair, that doesn’t mean it’s adjusted correctly. And if you can’t get your hands on an office chair, don’t worry. There are plenty of ways to make a kitchen or dining room chair ergonomically awesome.
Support Your Spine
No matter what kind of chair you use, you want something that will support your spine’s natural S-shape. To do that, you need to sit properly. So, start at the bottom and work your way up.
As you sit in the chair, your feet should be flat on the floor. Make sure you’re sitting evenly on your bottom and not tilting to one side or the other. Your thighs should be parallel to the floor (or your knees at about hip height).
The problem is that once you’ve adjusted your chair to the right height, your arms may not be at the right height for the keyboard. And, of course, your standard kitchen chair isn’t adjustable.
To create the perfect work throne, you may need to get creative. For example, if you need a higher chair so you can reach the keyboard, your feet may not rest on the floor. So, try out some shoes (flat heels only!) to see if some combination of chair height and shoes gives you the proper support for your feet. If shoes are out, try a footrest, step stool, or even a pile of books to achieve the right sitting posture.
An office chair may have a back with lower back support that encourages your spine’s natural curves. Your kitchen chair probably does not. To achieve a neutral spine, try a rolled-up towel or small pillow in the small of your back.
To Stand or Not to Stand
For some, a standing desk is the ideal combination of work and exercise—without the trip to the gym. One study found that working at a standing desk burns about 88 calories an hour. That’s not much, but it is slightly better than sitting and typing, which burns 80 calories an hour.
Calorie blasting aside, some people like a standing desk because it’s something different, or it gives their back a rest from sitting in a chair all day. However, if you are going to use a standing desk, be aware that it does come with its own ergonomic risks.
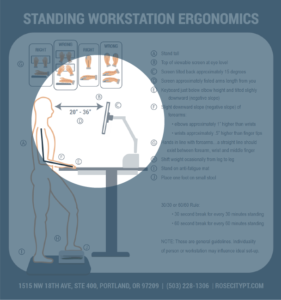
If you’re not used to standing all day, don’t jump into the first day of a standing desk by using it for eight hours straight! Start with 30 minutes a day and gradually increase your standing time. This decreases the risk that you might develop leg, foot, or, you guessed it, back pain.
When you work at a standing desk, the same rules about keyboard and mouse placement apply, so make sure you aren’t working at a standing desk that’s too tall or short for you.
Lastly, make sure you can stand up straight. Again, this doesn’t mean with a ramrod-straight spine. You need to stand with a neutral spine. That means standing at a desk, not necessarily a high counter.
Just like sitting at a desk, you need a standing desk (or other high surface), that lets you get the right distance away from your keyboard and screen. Some counters, like your kitchen counter, have a toe kick, the part under the cabinet that lets you stick your toes under while you work.
However, if the toe kick isn’t deep enough, you may find yourself too far from the desk. That, in turn, will mean you’re overextending your arms or leaning too far forward, which could put pressure on your spine. And, if you’re using an external monitor, if you don’t get the screen placed right, you may crane your neck or lean back without realizing it.
Keep a watchful eye on your posture when you work at a standing desk. If you’re feeling pain, stop and examine how you’re positioned and adjust it. The last thing you want is to not be able to sit or stand while you work.
Successfully (and Ergonomically) Working Remotely
Sure, working on the couch sounds like a dream. But, after a few days, you might be fighting aches. Back pain, leg pain, even neck pain are all possible. Take the time to carefully consider your home-office ergonomics when working remotely. Your back, your arms, and every other part of your body will thank you.
For a complete infographic guide and checklist on all aspects of computer workstation ergonomics, you can visit our neighbor, Rose City Physical Therapy’s website here.


The Orthopedic & Sports Medicine Center of Oregon is an award-winning, board-certified orthopedic group located in downtown Portland Oregon. We utilize both surgical and nonsurgical means to treat musculoskeletal trauma, spine diseases, sports injuries, degenerative diseases, infections, tumors and congenital disorders.
Our mission is to return our patients back to pain-free mobility and full strength as quickly and painlessly as possible using both surgical and non-surgical orthopedic procedures.
Our expert physicians provide leading-edge, comprehensive care in the diagnosis and treatment of orthopedic conditions, including total joint replacement and sports medicine. We apply the latest state-of-the-art techniques in order to return our patients to their active lifestyle.
If you’re looking for compassionate, expert orthopedic surgeons in Portland Oregon, contact OSM today.
Phone:
503-224-8399
Address
17355 Lower Boones Ferry Rd Suite 100A
Lake Oswego, OR 97035
Hours
Monday–Friday
8:00am – 4:30pm

